Painting wainscoting transforms any dining room from ordinary to elegant in just one weekend. This classic wood paneling adds instant character while protecting your walls from daily wear. Whether you’re working with flat panel designs or traditional beadboard, fresh paint creates an eye-catching design element that enhances your entire room.
The process is straightforward when you follow the right steps. This step by step guide walks you through everything from choosing the perfect semi gloss finish to applying your final coat. Get ready to create professional results that will make your house the envy of the neighborhood.
Key Takeaways
- Always use a drop cloth to prevent paint damage and make cleanup easier during your wainscoting project.
- Higher sheens like semi-gloss provide superior durability and easier cleaning for wainscoting compared to flat finishes.
- Use high-quality caulk to fill gaps between panels and trim for a professional, seamless appearance.
- Let OnDemand Painters handle your wainscoting projects for guaranteed professional results.
- Paint the upper part of walls and top portion separately from wainscoting for better control and cleaner lines.
- Paint baseboards, door trim, and other house trim elements to complement your wainscoting color scheme for cohesive design flow.
Understanding Wainscoting and Wood Paneling
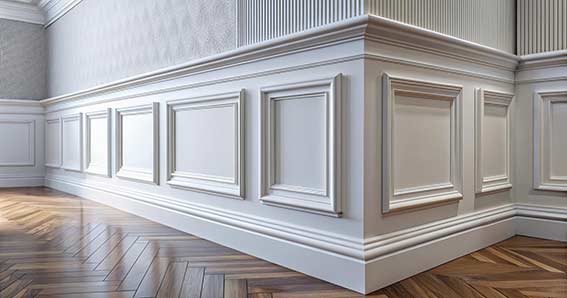
Wainscoting covers the lower portion of walls, typically extending one-third to half way up from the floor. A chair rail caps the top, creating a clean transition to the upper wall. This differs from traditional wood paneling, which often covers walls floor to ceiling.
Several styles work beautifully with paint:
- Flat panel wainscoting offers clean, modern lines
- Raised panel designs provide traditional elegance
- Beadboard creates charming cottage appeal
Dining rooms benefit most from wainscoting because it protects walls from chair damage while adding formal style. The wood paneling also works well in hallways, bedrooms, and bathrooms when painted with appropriate finishes.
Choosing Paint Colors and Materials
Semi gloss paint ranks as the top choice for wainscoting projects. Higher sheens resist moisture and clean easily, making them perfect for high-traffic areas. The slight shine reflects light and makes paint colors appear more vibrant.
Satin finishes offer a middle ground with good durability and less shine. Different sheens work together beautifully – try the same color in satin on walls and semi gloss on wainscoting for subtle contrast.
Paint colors create endless possibilities. Classic white works with any wall color, while a darker shade on wainscoting with lighter walls above creates sophisticated drama. Quality interior paint flows smoother and lasts longer than budget alternatives.
Tools and Materials You’ll Need
Before starting your painting wainscoting project, gather these essential supplies:
- Drop cloth to protect your floor
- High-quality primer for wood surfaces
- Semi gloss or satin paint in your chosen color
- Small paintbrush for detailed trim work
- Roller for flat panel surfaces
- Painter’s tape for clean edges
- Fine-grit sandpaper (220-grit)
- Caulk for filling gaps
- Clean rags and tack cloth
- Paint tray and liner
- Putty knife for repairs
- Light fixtures removal tools
A helpful tip: Buy slightly more paint than calculated. Touch-ups are common with wainscoting projects, and having extra ensures perfect color matching.
Step by Step Guide to Painting Wainscoting
Step 1: Prepare Your Space
Clear the room completely and lay a drop cloth across the entire floor. Remove light fixtures, outlet covers, and switch plates. Store hardware safely for easy reinstallation.
Apply painter’s tape along baseboards and door trim if painting different colors. This creates clean, professional edges that make your finished product look amazing.
Step 2: Clean All Surfaces
Wipe down every surface with warm soapy water. Years of dust and grime prevent proper paint adhesion. Pay extra attention to areas around light switches and the chair rail where hands frequently touch.
Allow everything to dry completely before moving to the next step. Rushing this process leads to poor paint performance.
Step 3: Sand and Repair
Lightly sand glossy areas and rough spots with fine-grit sandpaper. This helps new paint stick better to existing finishes. Remove all sanding dust with a tack cloth.
Fill nail holes with wood filler and gaps with caulk. Small imperfections become obvious after painting, so address them now. Allow repairs to dry completely.
Step 4: Apply Primer
Prime all wood surfaces with high-quality bonding primer. Use your small paintbrush for detailed areas and edges, then roll flat panel sections. Primer ensures proper adhesion and prevents wood tannins from bleeding through your finish coat.
Let primer dry according to manufacturer instructions. This usually takes 2-4 hours depending on humidity and temperature.
Step 5: Paint the First Coat
Start by cutting in all edges with your small paintbrush. Paint trim details, corners, and anywhere your roller can’t reach. Work in small sections to maintain a wet edge.
Use your roller for flat panel surfaces. Apply thin, even coats rather than trying to cover everything in one thick application. This produces smoother results.
Paint horizontal rails first, then immediately paint vertical sections. This technique ensures proper brush stroke direction and prevents visible overlap marks.
Step 6: Apply the Second Coat
After the first coat dries completely (usually 4-6 hours), apply your second coat using the same technique. Two coats provide better coverage and color depth than one heavy application.
Remove painter’s tape while the paint is still slightly wet to prevent peeling. Your wainscoting should now look smooth and professional.
Helpful Tips for Professional Results
Getting professional-looking wainscoting requires attention to detail and smart techniques. These helpful tips make the difference between amateur and expert results.
Work in Small Sections
Paint one 2-foot section at a time rather than tackling entire walls. This approach prevents lap marks and ensures smooth, even coverage. Complete all trim work in a section before moving to the next area.
Master Your Brush Technique
Direction matters when painting wood paneling. Paint horizontal elements like chair rails with horizontal strokes, then vertical paneling with long vertical strokes. This creates the proper grain pattern and hides brush marks effectively.
Maintain a Wet Edge
Never let paint edges dry before connecting to the next section. Dried edges create visible lines in your finished product. Work quickly but carefully, especially in warm rooms where paint dries faster.
Check Your Work in Different Light
Natural light reveals imperfections that artificial light hides. Inspect your work by windows during daylight to spot missed areas or uneven coverage. Touch up immediately rather than waiting until the entire room is complete.
Special Considerations for Different Rooms
Dining Room Wainscoting
Dining rooms see heavy use, making durability crucial. Semi gloss paint handles chair bumps and frequent cleaning better than lower sheens. Consider darker colors that hide scuff marks while maintaining elegance.
Coordinate your wainscoting color with existing elements. If your dining room features warm wood furniture, choose paint colors that complement rather than clash. Cool grays work beautifully with modern furnishings, while warm whites suit traditional settings.
High-Moisture Areas
Bathrooms and kitchens require special attention. Use high-quality primer designed for moisture-prone areas. Semi gloss or satin finishes resist humidity better than flat paint and clean easily when water spots appear.
Allow extra drying time in humid spaces. Poor ventilation slows curing and can cause paint problems later. Run exhaust fans during and after painting to promote proper drying.
Coordinating with Baseboards and Door Trim
Create visual flow by coordinating wainscoting with existing trim. Paint baseboards and door trim the same color as your wainscoting for seamless integration. This approach makes rooms feel larger and more cohesive.
Alternatively, paint trim white while using color on wainscoting. This traditional approach works especially well when you want the wood paneling to stand out as a focal point.
Color Schemes and Design Ideas
Same Color, Different Sheens
Use the same color throughout your room but vary the sheen for subtle sophistication. Paint walls in eggshell and wainscoting in semi gloss. This creates gentle contrast while maintaining color harmony.
This technique works particularly well with neutral colors like soft grays, warm whites, or subtle beiges. The different sheens catch light differently, adding depth without bold color contrasts.
Contrasting Colors for Drama
A darker shade on wainscoting with lighter walls above creates stunning visual impact. Try deep navy wainscoting with crisp white walls, or rich charcoal paneling with soft gray upper walls.
This approach makes ceilings appear higher while grounding the space. The contrast draws attention to the architectural detail and creates a modern look that feels both classic and contemporary.
Monochromatic Sophistication
Choose varying shades of the same color family for sophisticated results. Paint wainscoting in a medium gray with lighter gray walls, or try cream wainscoting with white walls. This creates depth while maintaining a calm, elegant atmosphere.
Add interest through texture rather than color. Smooth walls contrast beautifully with detailed wainscoting profiles when painted in similar tones.
Maintenance and Long-Term Care
Regular Cleaning
Painted wainscoting stays beautiful with simple maintenance. Dust regularly with a microfiber cloth, paying attention to detailed areas where dust accumulates. For deeper cleaning, use mild soap and water on a barely damp cloth.
Higher sheens like semi gloss handle cleaning better than flat finishes. This durability makes them perfect for areas that get touched frequently or need regular washing.
When to Touch Up
Minor scuffs and chips are easily noticed on painted surfaces. Address small problems immediately with leftover paint rather than letting damage accumulate. Keep a small amount of paint for touch-ups – even years later, you’ll appreciate having it available.
Touch up areas receive more wear first. Chair rail tops, corners, and areas near light switches typically need attention before other surfaces. A small paintbrush and steady hand fix most minor issues quickly.
Protecting Your Investment
Your painted wainscoting represents significant time and effort. Protect it with furniture pads on chair backs and careful placement of items that might scratch surfaces. Regular maintenance keeps your room looking fresh for years.
Consider the room’s function when planning protection. Dining rooms need chair rail protection, while hallways benefit from careful furniture placement to prevent gouges and scratches.
Conclusion
Painting wainscoting transforms ordinary rooms into elegant spaces that reflect your personal style. This classic wood paneling adds character and sophistication while providing practical wall protection. Whether you choose crisp white for timeless appeal or bold colors for dramatic impact, proper technique ensures professional results.
The step by step guide outlined here works for any wainscoting style, from simple flat panels to elaborate raised designs. Remember that preparation makes the biggest difference in your finished product. Take time with cleaning, sanding, and priming for results that last.
For homeowners who prefer professional results without the DIY effort, companies like OnDemand Painters bring expertise and efficiency to wainscoting projects. Professional painters have the tools, techniques, and experience to handle challenging details while ensuring flawless results.
Your newly painted wainscoting will become a beloved feature that enhances your home’s beauty and value. The combination of classic appeal and fresh color creates spaces you’ll enjoy for years to come. Whether tackling a single dining room or painting wainscoting throughout your house, the investment in time and materials pays dividends in improved aesthetics and increased home value.
FAQS
What kind of paint do you use on wainscoting?
Semi-gloss or satin paint works best for wainscoting because it provides durability and easy cleaning.
Do you paint wainscoting with a roller or brush?
Use a small paintbrush for detailed trim work and edges, then a roller for flat panel surfaces.
What is the golden rule for wainscoting?
Always paint horizontal rails first, then immediately paint vertical sections to ensure proper brush stroke direction.
Is wainscoting painted with semi-gloss?
Yes, semi-gloss is the preferred finish for wainscoting because it resists moisture and handles frequent cleaning.
Should I paint my wainscoting white?
Wainscoting white creates a timeless, classic look that works with any wall color and brightens your space.
How do I remove painter’s tape safely?
Remove painter’s tape while the paint is still slightly wet for safe removal that prevents peeling and creates clean lines.


