Drywall is a critical component of any home’s structure, yet it’s often overlooked until problems arise. Cracks, nail pops, and other issues can not only detract from the appearance of your walls but also indicate underlying issues that may worsen if not addressed. Understanding these common drywall problems and knowing how to fix them can save you time, money, and frustration.
Key Takeaways
- Catching drywall issues early saves you money and keeps your wall structurally sound.
- When two panels separate at joints, you’ll need to remove old tape and properly reapply new tape with compound.
- Bigger holes require cutting out the damaged section and installing a fresh drywall panel with backing.
- Where panels meet, smooth thin compound layers and blend edges so repairs disappear into the wall.
- Water damage needs quick action and often means replacing sections with mold-resistant materials.
- OnDemand Painters can tackle complex drywall repairs when DIY methods aren’t enough.
Understanding Drywall Problems
Most common drywall problems stem from structural issues, temperature changes, or wear and tear on interior walls. These issues can result from environmental changes, improper installation, or house settling over time.
Identifying these problems early is the first step toward maintaining your home’s structural integrity. Drywall cracks often occur due to structural movement or temperature shifts, ranging from tiny hairlines to larger splits. Nail pops happen when screws or nails protrude from the surface, creating unsightly bumps and indicating wall movement.
Drywall Repair
Addressing drywall problems promptly is crucial for preventing larger issues. The sooner you repair issues like cracks or nail pops, the easier the fixes and the less likely they are to escalate into more significant problems. Having the right tools and understanding proper drywall repair techniques can go a long way in making effective repairs.
For instance, repairing a crack may require applying joint compound to fill the gap and smooth the surface. Meanwhile, fixing a nail pop often involves removing the protruding nail or screw and replacing it with a new one. Professional residential drywall repair services can handle more complex issues when DIY approaches aren’t sufficient.
Most Common Drywall Issues
Structural and Installation Problems
Failed Drywall Joints occur when the seams between drywall sheets crack or separate due to improper installation or natural house movement. These drywall joints require careful attention to prevent water damage and maintain structural integrity. Remove damaged drywall tape, apply new fiberglass mesh tape with joint compound, and sand smooth once dry.
Corner Bead Cracks appear where steel corner beads become loose or damaged at wall intersections. Corner bead issues are among the most common drywall problems in home building. Replace the damaged corner bead section with new material, apply joint compound with a wide drywall knife, and sand for a smooth surface.
Gaps Between Drywall Sheets up to 1/2-inch can be repaired by forcing drywall mud into gaps with a 12-inch knife. Work progressively along gaps where two adjoining sheets meet, then apply drywall tape and mud as usual.
Hanging Joints occur when drywall sheets don’t land on solid wood framing. These hanging joints create weak points that fail over time. Cut overhanging drywall to hit stud centers, or sister additional studs for proper support.
Tight Drywall Joints prevent natural expansion of wood framing, causing cracks during seasonal changes. Maintain proper spacing during drywall construction using spacing guides to prevent this common drywall problem.
Fastening and Surface Issues
Nail Pops and Drywall Screws create visible bumps when fasteners protrude from the surface. To fix nail pops, remove popped fasteners, re screw securely into wood framing, apply joint compound, and sand smooth. Screw pops require similar treatment for lasting drywall repair.
Over-Sanded Drywall Paper results from excessive sanding during drywall work. Apply a thin layer of joint compound over damaged areas using wide putty knife techniques, then sand lightly to restore the surface.
Misaligned Holes for Electrical Boxes can be prevented using various techniques available at hardware stores, including retrofit boxes after drywall installation or magnetic alignment tools for precise cuts in new drywall.
Visible Seams result from poor finishing work. Apply joint compound in progressively wider applications, feathering edges seamlessly with surrounding surfaces to achieve visual interest without obvious repair lines.
Surface Damage and Wear Issues
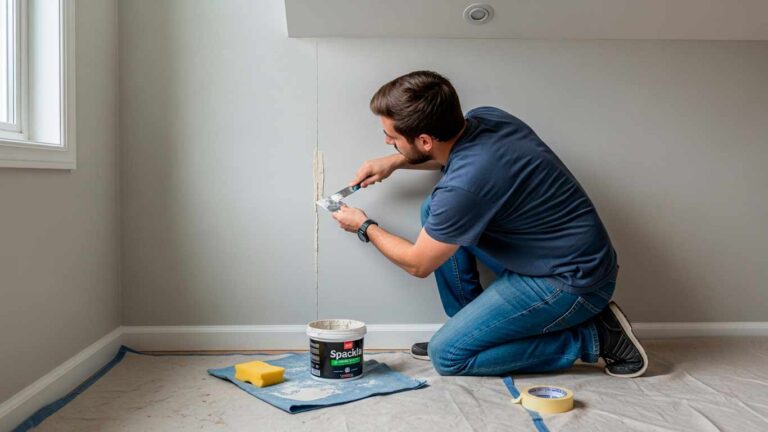
Small Holes from nails, screws, or minor impacts represent the most common drywall damage. Small holes drywall repairs are easily accomplished with spackling paste or lightweight joint compound applied with a putty knife. For bigger holes, use adhesive backing tape or adhesive tape patches before applying compound.
Large Holes require patching with new drywall sections. Cut damaged areas into clean squares, install backing support, secure new drywall panels, then apply drywall tape and mud seams for seamless integration.
Scuffs and Marks from Furniture create surface damage from daily wear and tear. Remove loose pieces from the damaged area, apply compound with putty knife, and sand smooth when dry.
Moisture and Environmental Problems
Water Damage appears as discoloration, sagging, or mold growth on walls and represents serious drywall damage. Water damage requires immediate attention to prevent large scale damage to interior walls. Fix water sources first, then replace severely damaged sections with mold-resistant materials to prevent mold development.
Mold on Drywall creates health hazards requiring immediate action. Small mold areas can be cleaned with specialized solutions, but extensive growth requires complete drywall replacement and professional remediation.
Sagging Drywall indicates serious structural issues requiring immediate professional assessment. Remove affected sections and reinstall with proper fastener spacing to restore structural integrity.
Tape and Joint Compound Issues
Cracking and Joint Compound problems range from hairline to significant splits in drywall surfaces. Apply joint compound for minor drywall cracks, or place fiberglass mesh tape for larger damage before applying compound layers. This versatile approach handles most cracking issues effectively.
Bubbling or Peeling Drywall Tape indicates insufficient compound underneath or improper application. Remove loose new drywall tape sections, apply fresh compound, and apply drywall tape properly, pressing firmly to eliminate air bubbles.
Uneven Surfaces result from improper joint compound application during drywall construction. Apply thin layer applications and sand gently between coats for smooth finishes across all surfaces.
Professional Drywall Repair Techniques
Choose appropriate materials for each repair situation. All-purpose joint compound works for general repairs, while lightweight compound offers easier handling. Setting-type compound provides stronger bonds for structural applications. Paper tape delivers smooth finishes but requires skill, while fiberglass mesh tape offers easier application for most drywall repairs.
Essential tools include wide drywall knives in multiple sizes, utility knife for cutting, sandpaper for finishing, and proper lighting for quality control. Many benefits come from using professional-grade tools for better results.
Advanced Methods
Maintain proper spacing during installation: adequate gaps between sheets, fasteners every 12 inches on edges. Feather compound edges by gradually thinning applications for seamless blending across surfaces.
Use low-angle lighting to highlight imperfections during repairs. Multiple thin applications produce better results than single thick coats when working with joint compound.
Preventive Measures in Drywall Construction
Prevent drywall problems through proper installation with quality materials, correct fastener spacing, and appropriate joint gaps. Regular maintenance and prompt attention to minor issues prevent major repairs. A licensed general contractor can ensure professional standards for large projects.
Environmental controls like proper ventilation and humidity management reduce stress on drywall systems. Professional installation ensures code compliance and long-term durability, representing the best solution for complex projects.
When to Call a Professional
Consider professional help for structural issues, extensive water damage, or repeatedly failing repairs. This handy guide covers basic repairs, but professionals have specialized tools and experience for complex problems requiring structural assessment.
Safety and code compliance are paramount for repairs involving electrical work or structural modifications. A licensed general contractor provides expertise for large scale damage or complex installations. For expert drywall repair and professional results, OnDemand Painters offers comprehensive drywall services to handle any repair challenge.
Conclusion
Drywall problems are often straightforward to fix with proper techniques and patience. Whether dealing with cracks, nail pops, or water damage, prompt attention prevents escalation into major issues affecting structural integrity.
Understanding the full range of potential problems—from surface damage to structural issues—enables better repair decisions. This easy fix approach works for many common situations, but when uncertain about repairs, consult professionals to ensure lasting solutions. Trust OnDemand Painters for expert drywall repairs and installations that restore your walls to perfect condition.
FAQs
How do I fix cracks in the ceiling?
Clean the area, apply joint compound over the crack, place fiberglass mesh tape over compound, smooth with putty knife, apply a second layer of joint compound, sand smooth when dry, and refinish the surface.
What’s the best way to repair small holes like those from a doorknob?
Use adhesive backing tape patches with joint compound applied over the patch, smooth with putty knife, sand lightly when dry, apply second layer if needed, and refinish to match surrounding wall.
What should I do about screw pops in my drywall?
Remove protruding screws, re-screw slightly above or below original position into wood framing, apply joint compound over the area, sand smooth, and refinish the repaired surface.
What are the most common reasons for drywall cracks, and how can I prevent them?
The most common reasons include improper installation, settling, and temperature changes. Prevent through proper joint spacing, quality materials, correct compound application, and regular maintenance with prompt minor repairs.
How do I handle bigger holes that require a drywall panel replacement?
Cut out the damaged section, measure and cut a new drywall panel to fit, secure it to the framing, then tape and mud the seams for a seamless repair.
What’s the proper technique when two panels meet at a joint?
Apply a thin layer of joint compound where the panels meet, embed drywall tape into the compound, smooth out air bubbles, and feather the edges for an invisible seam on the wall.


